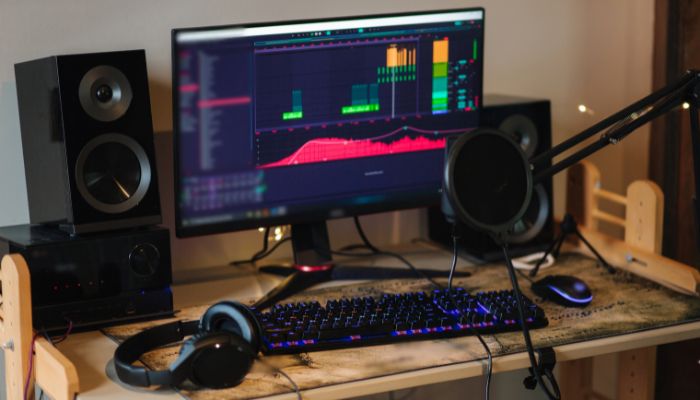
Pro Tools is an industry veteran, a stalwart of music production that you find in top studios worldwide.
The reason why Pro Tools is so popular is because of its robust and intuitive interface. It’s not flashy but utilitarian and just gets the job done.
Some of Pro Tools’ fortes are mixing and mastering.
In fact, when it comes to composition, other DAWs do probably trump Pro Tools. That said, producers who compose on other DAWs regularly import their projects into Pro Tools for mastering!
When mixing and mastering, Pro Tools’ excellent edit/mix windows make things simple and the workflow is top-notch.
Here is an introductory guide on how to mix and master in Pro Tools!
What is Mixing and Mastering?
For those that aren’t sure about what mixing and mastering actually is, mixing is the process of blending your various tracks and instruments into one cohesive master output.
Mastering is the process of tuning the master output to make your entire mix sound as good as possible.
Mastering also prepares your tracks for burning to CD or vinyl or uploading to streaming services.
Why Mix and Master on Pro Tools
When it comes to arguments over this DAW vs that DAW, probably the main differentiating factor between them is the user interface and taste.
The standards of DAWs are incredibly high. For anyone who doesn’t need massive multi-track recordings, advanced live audio capability or professional sound design for film and TV, the jury is out on which is the best DAW.
The main pros of Pro Tools for mixing and mastering are its intuitive interface and editing controls. It’s very easy to trim clips and add crossfades with the Smart Tool. You can draw volume controls directly onto the waveform without even switching to another tool.
In the Mix window, the faders are clearly displayed alongside their inserts and sends.
Visualising your signal flow is also straightforward in Pro Tools and there are some great stock plugins in the AIR bundle.
When Do You Start Mixing Your Track?
So you’ve been composing and producing your track, adding instruments, samples, FX and probably some other processing, whether that be reverbs, delays, distortion, compression or EQ.
Whilst mixing traditionally takes place after a track is finished, it is true that some mixing is done whilst we produce the track itself.
You’ll probably have to use EQ to shape the sound of some of your instruments and samples, removing bass and high-end as you go. This is more-or-less part of the mixing process.
Reverbs, delays and other effects are as useful in sound design and composition as they are in mixing. Whilst it’s good practice to keep your tracks broadly unprocessed until you’ve finished composing, some level of pre-mix processing is pretty much inevitable
When you approach the end of your song, be prepared to retrospectively audit all of your tracks.
You will probably have to make adjustments to many of your plugins, even if just slightly.
After you’re happy with your composition and sound design, it’s time to start mixing.
The goal of mixing is to blend your tracks into one cohesive whole.
Part 1: Mixing on Pro Tools
First off, you’ll need to add a master fader to your track:
You’ll then need to work on your gain staging.
This involves mixing the faders of your track so:
- The tracks themselves don’t clip and go into the red
- The track volumes don’t exceed the volume of their busses (where applicable)
- The master fader doesn’t clip
In modern electronic music production, it’s pretty common to have your faders running ‘hot’ (loud) into the master fader.
Modern limiters and master bus compressors will tame a hot mix to some extent, but it’s best-practice to mix your track volumes so your master fader sits in the green/low yellow region and not higher.
Here’s a useful analogy to visualise the mixing process:
- Think of your tracks as small glasses of liquid.
- Loud, big or fat tracks with plenty of bass are the thickest, heaviest and most plentiful liquids – they fill a lot of their glass.
- Quieter tracks (e.g. hi-hats) are thinner and fill less of their glass.
- Your master fader is another separate empty glass.
- The goal of mixing is to add the tracks to the empty master fader glass bit by bit, without overflowing the glass. Overflowing = clipping the master fader, which will ruin your entire track.
- You’ll need to mix the separate parts in stages, known as gain staging.
- Too much bass will overload your master fader, leaving no room to mix in your other tracks – your mix will send overly heavy and thick.
- Conversely, too little bass and too much mid and higher-end frequencies will leave your mix sounding thin and weightless.
- The goal of mixing is to get a good blend of all the ‘ingredients’ in the right proportions without overflowing and clipping your master fader.
EQ in Mixing
EQ is the most important effect of all, and by mastering it, you’ll make your music production life much easier.
In the above analogy, we’re mixing different tracks with different levels of various frequencies ranging from sub-bass (20Hz) to the highest of highs (20kHz).
Some frequency bands are more useful than others. For example, the 150 to 200Hz area usually corresponds with the punch of the kick. The presence of a vocal piece might fall into the 4 to 5kHz region.
Other ranges, such as a 300 to 400Hz range, have negative associations, e.g this particular range is known to be ‘muddy’.

EQ allows you to control the frequency balance of your mix.
Here are 3 tips to get you started:
- Cut unnecessary bass: Lots of tracks can accumulate bass that simply isn’t useful. That bass will conflict and cloud your actual basslines and bassy instruments like kick drums. Apply a high-pass EQ filter to tracks that don’t need a bass presence. You’re probably looking at the 400kHz mark as a starting point. Cut bass whilst retaining the warmth and fullness of percussion, vocals and lead sounds. Similarly, you can low-pass bassy instruments that don’t require their higher frequencies.
- Target muddy or boomy frequencies: The classic ‘muddy’ region lies around 300Hz to 400Hz (the upper bass band). Consider cutting this region by some 3 to 5dB. You can also apply a larger notch to any particularly nasty sounding frequencies.
- Reduce harshness: The 2kHz to 4kHz region can be pretty harsh and tinny. Consider gently cutting percussion and drums in this area to reduce overall harshness.
The trick with EQ is to be subtle and clinical. If you find yourself boosting massive portions of the frequency spectrum then there’s something wrong.
If you’re finding EQ tough then check your mix environment – you need decent monitor speakers or room simulation like Waves NX if you’re only able to use headphones. Bear in mind that standard monitors won’t produce an awful lot of very low bass – avoid overcompensating by cranking the bass on your tracks.
Compression in Mixing
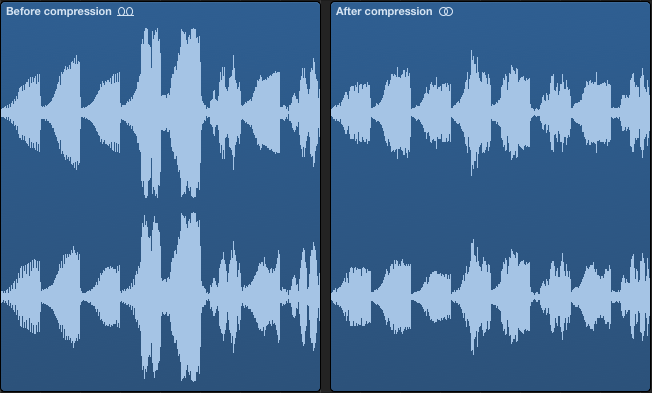
What you’ll likely find is that some tracks clip their meters, but only with certain shorter sounds called transients.
An example of a transient sound is a snare drum – super loud but only for a fraction of a second.
Transient sounds pose a problem during the mixdown. This relates to the concept of dynamic range – the difference between the loudest and quietest sounds in the mix.
Compression allows you to compress the loudest sounds of the mix, bringing them more in line with the quietest sounds of the mix.
Below shows a waveform before and after compression. The waveform on the right has quieter peaks. This allows you to raise the volume of the entire track without the peaks clipping the meter.
Compression essentially makes your tracks fatter and weightier at the same peak volume.
Creating Space: Panning, Reverb, Delay and Widening
Your track will likely be a mixture of mono and stereo tracks.
Panning is the first step to arrange your mix across the stereo field, the aim being to create a wide, 3D sound stage.
Mono tracks have just one channel. They remain in the centre of the mix unless you choose to pan them left or right.
Centrally panned mono best suits kick drums, basslines and other percussive or bassy sounds. You can pan bass guitars slightly. This keeps the main pulse of the track dead centre, which is usually preferable.
Other instruments should be panned around the stereo spectrum.
For example, you might choose to place a guitar somewhere on the right of the stereo field and a saxophone/trumpet/another melodic instrument on the left. The vocals also usually sit towards the centre of the mix.
Think of the centre of your mix as the inner core – this is where the focus of the track is. The ‘sides’ are what gives the track depth and dimension.
Reverb and Delay
Panning will animate the soundstage of your track on its own, but you’ll need to add some reverb and delay to bring some movement to sounds. There are lots of plugins that can create dynamics and movement, but reverb and delay are the most common and fundamental to master.
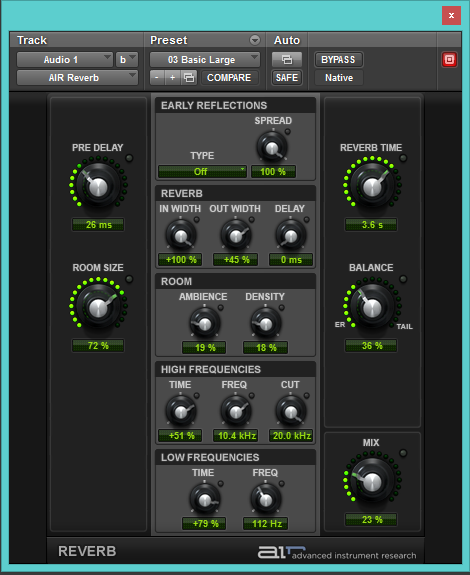
Reverb can be used on most instruments aside from the most bassy, where it should be used with caution. Experiment with reverb presets, you’ll want to time the decay so it suits the tempo of your track. Long, ambient sounds and pads can sound great when drenched in reverb, but transient sounds will be lost if you use too much.
The standard reverb that comes with Pro Tools is the AIR Reverb, which is clean, rich and straightforward to use.
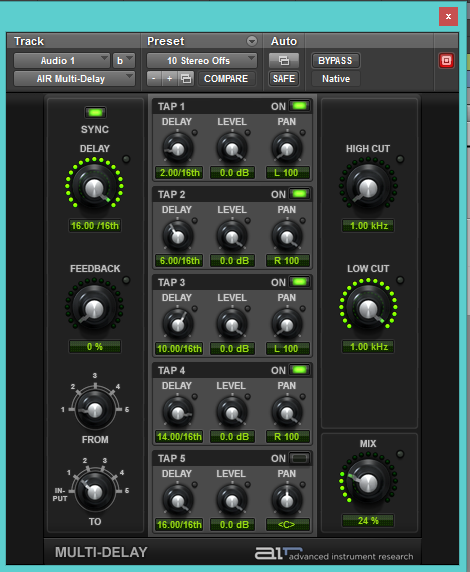
Delay creates movement, allowing you to ‘ping pong’ your sounds across the stereo field. Avoid using delay with bassy sounds.
The standard Pro Tools delays include the AIR Dynamic Delay and Multi Delay. Both can add movement and stereo interest to your tracks.
Part 2: Mastering in Pro Tools
The mastering process is very difficult to sum up in just one short article, but the ‘art of mastering’ has become much simpler in recent years thanks to powerful plugins like Izotope Ozone.
Izotope Ozone and similar plugins can polarise producers, but the fact is, there’s no such thing as an ‘easy master’ or ‘one-touch master’. Even plugins like Ozone take time, dedication and experimentation to master.
Here is a short guide to mastering in Pro Tools:
Organise Your Tracks
There are a few different approaches to mastering a track in Pro Tools.
The first consideration is that mastering plugins can be CPU-heavy. If your session is already a bit unstable then you might want to consider exporting your mix and importing it into a new session specifically for the master.
The pros of this are that you can master your tune to the max without any interference from lag or glitches. If you’re already pushing your CPU’s limits then mastering in the same session will be very tricky indeed.
You could print all of your tracks to new tracks and then disable them and their plugins, but this could be time-consuming.
You could also print your entire mix to a new track within the same session and then master that track. This allows you to go back into the mix and make changes if you need to.
This is what Brian Buckelew does in the following video.
However, you still might find the session pretty CPU-heavy.
A fresh start might be the best way to go – simply bounce your mix to a stereo Wav and import it into a new Pro Tools session.
Master Bus Processing
There are many approaches to mastering, but the fundamental process is applying processing to the entire track.
The four basic processors you’ll use on the master bus/output are:
EQ and/or dynamic EQ – to apply small EQs to your entire mix and balance frequencies across the spectrum. Dynamic EQ is a type of EQ that reacts to the volume of an incoming signal.
Compression – to compress the entire track as one. This has the famous effect of glueing things together. There are many famous bus compressors, like the SSL G-Master Bus Compressor and Shadow Hills Mastering Compressor, both of which are available as plugins.
Stereo widening and imaging – stereo widening tools help widen your overall stereo image. There is an imaging tool as part of Izotope Ozone.
Limiters and maximisers – to maximise the volume of your track and bring the average volume up to the desired level.
You’ll also need a LUFs meter and/or analyzer to analyze your signal’s levels and phase. The Waves PAZ Analyzer is excellent and inexpensive (also comes as part of the Waves Gold Bundle).
Use Reference Tracks
Find a suitable genre reference track to compare with your master. Load them into your session and add an analyzer so you can compare what’s going on side-by-side.
It’s important to not be discouraged if your master sounds nothing like a commercial track – this is completely normal. The aim is to achieve a warm, balanced and reasonably loud master, not an instant radio-ready super-loud banger (though that would be nice!).
Loudness is overrated in many ways. Some modern electronic music has become ‘broken’ in that it’s just too loud and distorted – read up on the Loudness Wars.
There is a renaissance of producers returning to more natural masters with lower average volumes than has become the ‘norm’.
The authentic home-brew master is a great starting point for any producer and loudness shouldn’t be a major worry, even if it’s what keeps you up at night (apart from that pesky snare that you just can’t seem to get right).
Summary: How to Mix and Master in Pro Tools
There’s no bottom to mixing and mastering – you could discuss these topics forever.
Sometimes a little less talk and a little more action are what music producers need, though.
Instead of burying yourself in tons of writing and guides on mixing and mastering, get stuck into experimenting in your own way with the tools that you’ve got.
It’s very easy to get bogged down when comparing your tracks to others, particularly commercially mastered tunes.
Keep things simple and aim to do the best with what you’ve got. You can definitely achieve a solid-sounding mix and master with basic plugins.
Avoid overkilling your tracks with plugins – focus on the sound design and composition first.
Never skip mixing for mastering straight away and never just think “I’ll fix that in the master”.